In digital marketing, it's crucial to stay ahead of the curve. One powerful tool that can help you achieve marketing excellence is HubSpot. This all-in-one marketing platform offers an array of features, and at the forefront are workflows - your secret weapon for creating impactful nurture and drip campaigns.
What are HubSpot Workflows?
Before we dive into the world of HubSpot workflows, let's start with the basics:
What Are Workflows?
Workflows in HubSpot are automated sequences of actions that are triggered by a specific event. These actions can range from sending an email to updating contact properties or even enrolling contacts in a series of nurturing emails.
Why Are They Important?
Workflows are the backbone of any successful marketing strategy. They allow you to automate repetitive tasks, nurture leads, and engage with your audience at the right time, all while providing a personalized experience.
Setting Up Your First HubSpot Workflow
Let's get to work setting up your first HubSpot workflow.
Choose Your Trigger
Your workflow starts with selecting a trigger. The trigger is the event that initiates your nurture workflow. It could be a form submission, a specific page visit, a persona, a lead score below the MQL threshold, or even the date a contact was created in your CRM.
Define Your Actions
Once you have your trigger, it's time to set your actions. These are the steps you want your workflow to perform once it's activated. Common actions include sending a welcome email, adding a contact to a specific list, and then scheduling out emails, tasks, and other actions.
Personalization Is Key
The magic of HubSpot workflows lies in personalization.
Make sure to segment your audience effectively, tailor your content to their needs, and send the right message at the right time.
Use personalization tokens within email subject lines, preview text, and the body to engaged recipients. You can even use smart content in a HubSpot email where certain sections, images, links, etc. vary depending upon the segmentation of the recipient.
For example, an email addressing common pain points buyers encounter (and how your software solves these issues) can vary depending upon persona. If one persona for your SaaS company is a freelance graphic designer while another is an art professor, the pain points (and solutions) will differ for each group. Freelance designers might worry about subscription-level pricing, while art professors care more about student adoption rates and university discounts. You can either create different nurture campaigns for each persona or use smart content to send curated email content to them.
Nurture Campaigns
Nurture campaigns are designed to guide your leads through the sales funnel. They help you build relationships with your prospects and move them closer to a purchase decision.
Content is King
In your nurture campaigns, the quality of your content is paramount. Whether it's educational blog posts, informative ebooks, or captivating webinar recordings, the goal is to provide value. Don't forget to leverage dynamic content to make your emails even more personalized.
Timing Matters
The timing of your emails can make or break a nurture campaign. Consider your usual sales cycle. An accelerated nurture campaign makes sense if your average time from first contact to sale is 30 days. Provide useful information to prospects as they gather information before buying within that month.
If your sales cycle average is 18 months, then you need to pace your nurture campaign differently. Sending 1-2 emails within the first month and then a monthly piece of content thereafter might be one approach. You can use HubSpot's powerful scheduling tools to send messages at optimal times, ensuring that your leads remain engaged throughout their journey.
Here's Our HubSpot Workflows 101 How-To Guide For Nurture Campaigns
Step 1: Set Clear Campaign Goals
Before building your email nurture campaign, you must define clear goals. What do you want to achieve with this campaign? Are you trying to nurture leads, convert leads into customers, or re-engage with existing customers for a cross-selling opportunity? Or perhaps you need a re-engagement nurture campaign for marketing qualified leads who never had a sales conversation.
Your goals will influence the content and structure of your campaign. You'll also program your goals into your workflow so that contacts are removed from the workflow once they meet your criteria. Here are some common goals for HubSpot nurture campaigns:
- Contact becomes an MQL through lead scoring demographics or behavior and is given to sales for qualification and follow-up.
- Contact completes an activity (contact us website form, webinar attendance with a request for a follow-up, phone call, email, text, or chatbot request to talk to sales) and becomes an MQL.
- Contact sets up a meeting with sales or customer support. This can be virtual, through a calendar connected to HubSpot using a meeting tool like a Zoom call or an in-person tour. It depends upon how your organization operates.
- Contact enters a sales sequence as part of sales outreach/prospecting.
- Contact unsubscribed from email.
- Contact is added to a suppression list for any reason.
Step 2: Understand Your Audience
Segment your audience based on their demographics, behavior, and where they are in the buyer's journey. HubSpot allows you to create lists and segments to target specific groups. Understanding your audience will help you deliver more relevant content. (You have probably already thought this through during the "personalization is key" phase, but this is your chance to build your list or finalize your enrollment triggers.)
Step 3: Create High-Quality Content
Develop content that aligns with your campaign's goals and the needs of your audience. This content can include blog posts, ebooks, whitepapers, case studies, or any other valuable resources. HubSpot makes it easy to create and format your emails.
Please note that you must save your nurture emails as "automated emails" in HubSpot and have them ready to go when you sit down to create your workflow. We recommend using HubSpot's drag-and-drop editor when creating the emails or any templates you've developed in the portal. Be sure your nurture campaign has the same look and feel throughout. Keep your imagery, buttons, and modules consistent.
Pro tip: create a folder for each nurture campaign and name your emails with a number to make it easy to find them in the future/program them in your workflow. Here's an example:
- Brand | Service Line x | Vicki the VP Persona Nurture | #1 or: Brand | Service Line x Nurture | #1
Step 4: Set Up Your Workflow
In HubSpot, you can create workflows to automate your email nurture campaign. Here's how:
-
Log in to HubSpot: If you haven't already, log in to your HubSpot account and be sure you're in the right portal or brand if you have more than one. We know this is basic, but we've seen this go wrong before! There's nothing worse than an entire workflow and emails set up for the wrong brand, portal, or business unit.
-
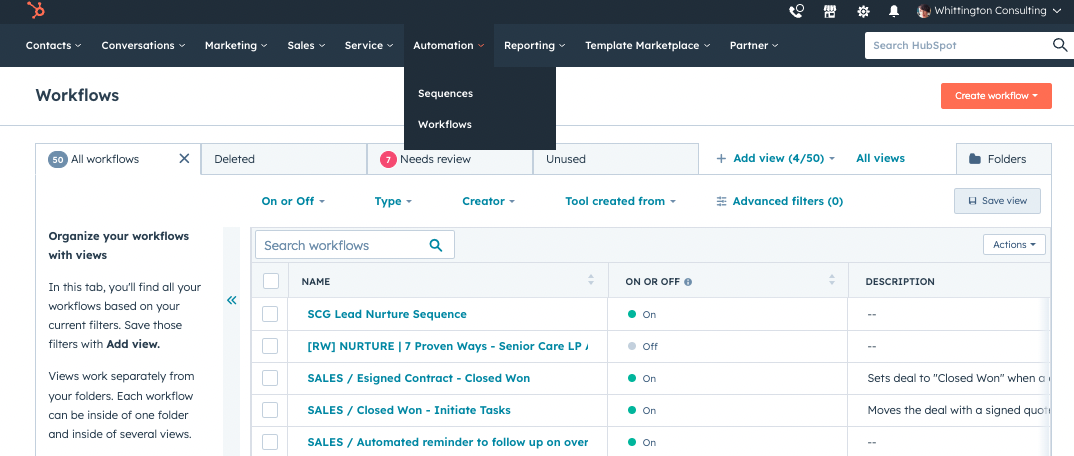
Navigate to Workflows: Go to the "Automation" section in HubSpot and select "Workflows."
-
Create a New Workflow: Click "Create workflow" and then choose whether to create a workflow from scratch for from a template.
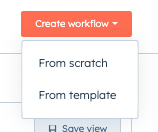
a. If you choose "From Scratch," you'll need to tell HubSpot that you need a contact-based blank workflow (which is the easiest blank slate to work from for a nurture campaign unless you plan to begin a nurture campaign based on a contact date action).
This option provides an empty enrollment trigger box that you can begin working with immediately: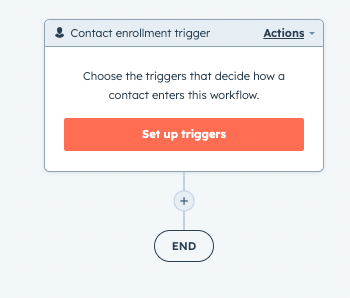
b. If you choose to use a template, we recommend the "Send 4-email drip campaign to customers" or "send an email series when a form is submitted" template, as they can be easily changed to fit your needs for a nurture campaign. You'll just need to adjust the enrollment triggers, timing, and number of emails to fit your nurture campaign. You can hit "preview" to see an overview of each template before committing.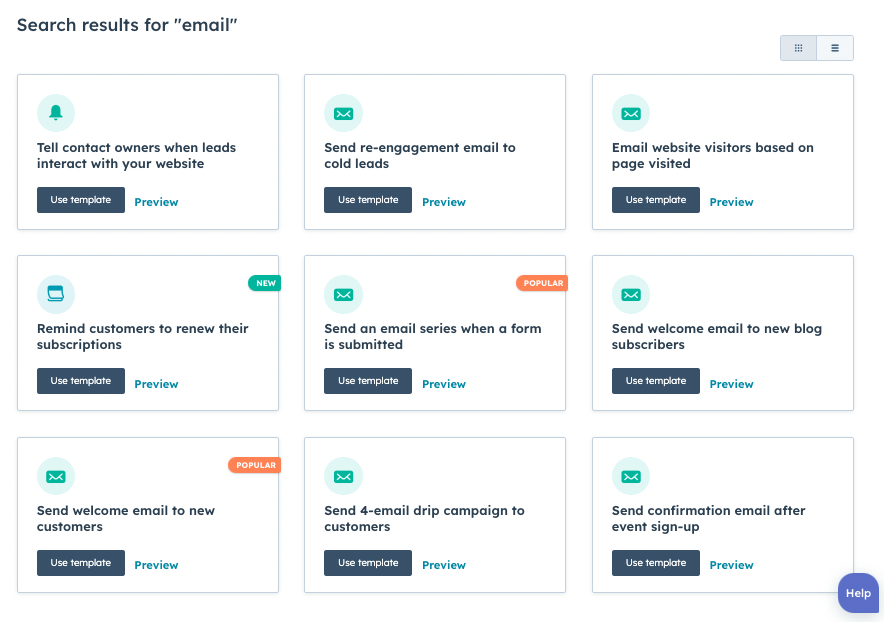
Note: template availability varies by subscription level. -
Define Enrollment Criteria: Set the conditions that determine when a contact enters the workflow. This could be based on specific properties or list membership.
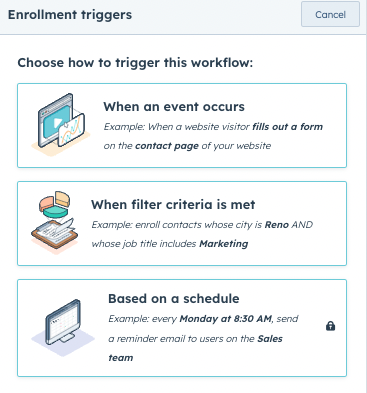
In my example, I've chosen the option "when filter criteria are met" and then filtered by "Contact" and "List Membership". I can then choose one or more lists I have created for my nurture campaign and use this filter as my enrollment criteria.
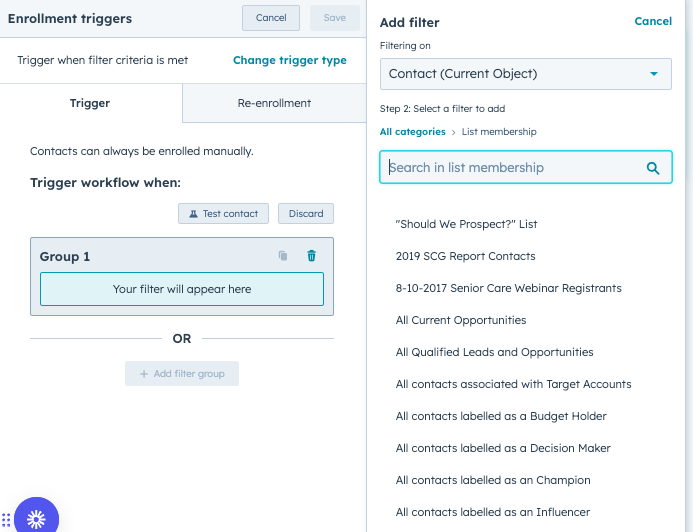
I can use multiple criteria within one group. In this example, I have chosen list membership in "All contacts labeled as a Decision Maker" to select contacts that are likely to convert, with the condition that their "Became a customer date" and "Deal Stage" are unknown to be sure that I don't send a marketing campaign to a current client or contact associated with an active or closed deal. Ideally, I would filter out existing sales leads and customers when building my list, but in this case, a teammate developed our Decision Maker list for another purpose, and I don't want to change it, so I've adjusted the enrollment criteria.
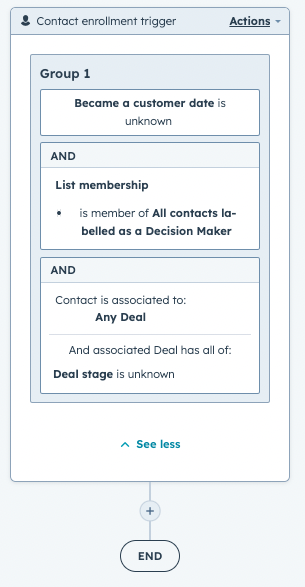
I can also have multiple groups within my enrollment criteria. In this example, I have added a second group: my filter is set to the contact property of "Persona," and I've chosen contacts in my HubSpot portal with the persona of Marketing Melissa or Creative Caroline.
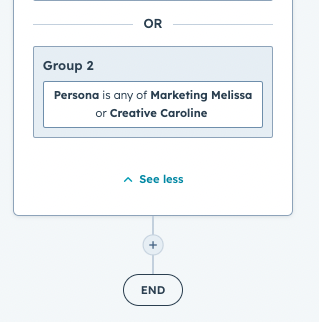
List membership and personas are two of the easiest and most popular enrollment triggers for nurture campaigns.
HubSpot has a good Knowledge Base article on workflow enrollment triggers that might be helpful if you have more questions.
5. Add Workflow Actions: Create a series of emails that will be sent to contacts. You can also include other actions, such as delays, branching conditions, or internal notifications.
6. Test Your Workflow: Always test your workflow to ensure it's working as expected.
Step 6: Monitor and Analyze Performance
Regularly monitor the performance of your email nurture campaign in HubSpot. Analyze key metrics such as open rates, click-through rates, conversion rates, and overall engagement. HubSpot provides detailed analytics and reporting to help you make data-driven decisions.
One thing you'll regularly want to monitor is the "Alerts" section which will tell you of any errors during the execution of the workflow.
Step 7: Optimize and Iterate
Based on the performance data, make necessary adjustments to your email nurture campaign. This might include changing the email content, adjusting the workflow, or refining your audience segments. Continuous optimization is essential for long-term success.
Step 8: Measure and Report on Results
After running your email nurture campaign, measure the results against your initial goals. Create reports and share the results with your team to evaluate the campaign's effectiveness and identify areas for improvement.
Remember that a successful email nurture campaign in HubSpot requires ongoing attention and refinement. It's crucial to adapt to changing audience needs and market dynamics to achieve your desired outcomes.
In Conclusion
Mastering HubSpot workflows is your gateway to effective marketing automation. With nurture campaigns at your disposal, you can nurture leads, drive conversions, and provide a personalized experience that keeps your audience engaged.